
Tuesday, 5 May 2015

Evaluation of Claudia & Mrs Laderman
The last and final topic of the year. I am so thankful that it's finished, not in a bad way. Creating Claudia and Mrs Laderman wasn't as hard/stressful as I thought. Luckily I feel like everything went smoothly for the first Time in my course.
I'd say the hardest part of this project was the presentation part where a lot of research needed to be carried out. In a way this could be why I found creating the looks quite easy because there was a great amount of planning before hand.
I'd say the hardest part of this project was the presentation part where a lot of research needed to be carried out. In a way this could be why I found creating the looks quite easy because there was a great amount of planning before hand.
I would say for this project I could have possibly worked harder on my time management, as I shot both Claudia and Mrs. Laderman final images today. However knowing myself I work so much more better under pressure.
Out of the three projects I have work on this year, I'd still have to say 'great expectations' was my favourite. I enjoyed Claudia and Mrs.Laderman but I feel if I had the same amount of time as I did for the new Elizabethans and great expectations my chosen look could have been slightly better in detail.
Monday, 4 May 2015
Presentation Week
So we had to do a 5 minute informal presentation on our new topic. I absolutely hate speaking in public even if its people I know, I guess its not for everyone.
However the class was split so I was only presenting in front of Kat and around 7 of my peers.
I initially felt that I had done the whole thing WRONG! but after presenting Kat said it was not and asked a few questions about the presentation.
Now I just have to work on my confidence in order to present over the newt two years.
Sunday, 3 May 2015
Dark Eyes & Lip
Dark Eye Dark Lip
In Fennella's lesson today I learned how to create a smoky eye and dark lip

In Fennella's lesson today I learned how to create a smoky eye and dark lip
- Mac Studio Fix Fluid
- Gosh Foundation Primer Classic
- Illamasqua Loose Powder
- Estee Lauder Bold Volume lifting mascara
- Kryolan Eye shadow palette (Black pepper & Caraway)
- Rimmel 128 Starry-eyed
- Barry M Brow Kit
- Foundation brush
- Blending Brush
- Brow Brush
- Eye shadow brush
- Angle Brush
- Cleanse and Moisturise the face
- Apply Primer
- Apply foundation base
- Blend foundation thoroughly
- Apply loose powder, especially around eye area
- starting with Caraway cover the eyelid
- build up with Black pepper
- Apply Brow powder to the brow
- Apply the lipstick.

Horror & Fashion
Horror & Fashion
Today in Fennella's lesson I had to recreate a designers fashion show look. I chose Dolce & Gabanna for their 2010 S/S.
Dolce & Gabbana 2010 S/S
‘Red Blooded Woman’
‘Latin’ Pat round the eyes with champagne eye shadow. Apply
pinky beige shades up to the brows and underneath the eyes. For the lips a rich
velvety texture is key. Fix the messy up do with gold head pieces leaving some
strands around the face. This Latin woman is passionate, dangerous and sexy
like a wild cat.
- Cleanse and Moisturise
- Prime and apply foundation base
- Blend until the skin looks flawless
- Apply the eye shadow making sure you go up to the brow bone
- Contour the cheeks and highlight the nose, forehead and chin
- Apply a red colour to the lips.

And The Finished Look!!!

Evaluation of project
Evaluation
So the 'Great Expectations' unit has come to an end. I must say I have enjoyed this unit much more than 'Red heads & Royalty'. As with any assignment there was stressful days, but I guess that's just what happens working under pressure and panicking that everything goes smoothly. This unit has been very interesting, I think I possibly read 'Great Expectations' in school but didn't remember anything about the story. However maybe its the fact that I'm older I found the story really interesting along with the film and BBC 3 part series.
I'n my opinion of my Miss Havisham continuity, I feel I could of made it a bit more exact, even though my model thinks the two finished images look very similar. In speaking that I still need to look through my images and compare. During my second timed assessment, my gelatine went wrong, as i forgot to soak it first. So when it came to heating it just started to fizzle. I added water to it and managed to get some out of it to complete my look.
I know for the future that I will need to write my step by step in greater depth and possibly have back up stock in the event of disaster.
I am really happy with my informal assessment, of the character Estella. Everything went smoothly, this could be because it was informal so there was less pressure. The make up and images in my opinion are just what I wanted to achieve.
Miss Havisham Continuity
So the day has come where I had to recreate my Miss Havisham. How did it go? Not as good as id liked it to have.

- Gelatine
- Foundation
- Primer
- Ben Nye contour palette
- Glycerine
- Supra colour palette
- Fake blood
- Medium curlers
- Tail comb
- Hair pins
- Dry shampoo
My make up application was fine, and all went to plan. I had a lil hiccup with my gelatine, as I forgot to soak it first which nearly ruined it.
In the end I managed to fix the issue and apply the gelatine where needed.
My before and after Miss Havisham are similar but not sure if I quite captured the continuity. My model thinks the application looks the same but I'm unsure.
Well here it is my finished continuity look along with my face chart and notes.
Informal Timed Assessment (Estella)
Estella
After completing my formal timed assessment for Miss Havisham, I then had to choose to recreate either Pip or Estella. I chose to recreate Estella and used Martina as my model. I would say in my opinion that this task was probably the easiest, as Estella's look in 'Great Expectations' is very much like a traditional Victorian woman. Through research at the beginning of the semester I learned that woman from the Victorian era frowned upon make up and normally it would be associated with woman of the night.
I chose to do my version of Estella how I saw her in the film and BBC series, Quite natural looking and very tidy hair.
Here is my Finished look of Estella
Timed Assessment (Miss Havisham)

I think my assessment went well, I'd say better than last semester, I think this was due to me being able to apply my own make up ideas to my model instead of creating her look on her.
Well here it is..... Let's hope I can recreate this exactly in two weeks time :)

Death Mask
A death mask is a historical way of remembering a loved one who has passed. The makers would use wax or plaster craft to make a mask of the dead persons face, this could be used as a memento, or to create portraits after the persons passing.
Many countries use death masks including Ancient Egypt, where Tutankhamun has one of the worlds most famous masks.
The face of the CPR dummy used in first aid is the face of Resusci Anne also known as Rescue Anne, is the face of a young unidentified woman who was found drowned in River Seine around 1880.
 |
| http://media.wnyc.org/media/photologue/photos/inconnue_resusci_anne.jpg |
 |
| http://em.pgpic.com/images/vm/Asmund_Laerdal_with_the_Resusci_Anne.jpg |
Initially I was really happy with my death mask, but unfortunately I lost the images in my phone. I recreated my death mask in my own time.
.jpg)
.jpg)
High Definition Broadcasting
High Definition Broadcasting
High definition broadcasting is a high quality of viewing media, such as images, tv and film.
It gives a clearer picture than a normal image.
For make up artists this can be a problem as you will be able to see every detail, therefore the make up application would need to be immaculate
High definition broadcasting is a high quality of viewing media, such as images, tv and film.
It gives a clearer picture than a normal image.
For make up artists this can be a problem as you will be able to see every detail, therefore the make up application would need to be immaculate
Continuity & Its importance in TV & Film
Continuity
Continuity plays a big importance in TV and film. Continuity is where make up or costume needs to remain exactly the same throughout different times in the show. For example if you was to create a make up or costume set, you would need to ensure that if the set was to be continued on another date you would be able to match both sets.
There has been occasions where myself as the viewer has noticed where continuity hasn't been achieved to the best.
Here is a few continuity mistakes on big premier films:
This Image from Harry Potter and the Philosophers
Stone' shows Harry (Daniel Radcliffe) sitting on two different sides of the same scene.
 |
| https://thechive.files.wordpress.com/2011/07/17-continuity-errors-harry-potter-5.jpg |
Here in 'Pretty Woman' Julia Roberts appears to be eating what looks like an unusual piece of food and then in another image she is eating a pancake
 |
| https://jordansumray.files.wordpress.com/2011/10/screen-shot-2011-10-12-at-10-07-532.png |
Estella Practice Hair
In studio today I have been practising the hairstyle in which I will be creating for my informal Estella assessment. Estella's character unlike her mother is quite a tidy look.


So I have chosen to give her a traditional Victorian look.
Things I used
Things I used
- Pin tail comb
- Small curling tongs
- x2 hair grips
- x1 hair band
- hair pins
- hair gel
- hair spray
The hairstyle is quite simple to create
- Firstly I sectioned the hair into three parts(front, middle & back)
- I then parted the front section so that the hair was centre parted
- I styled the middle section in a ponytail and then created a bun
- Curled the back section
- In the front I swooped on side round the ear and pined in place with a hair grip
- Then I repeated on the opposite side
- I sprayed hair spray to hold in place
Ageing
I was not present in the initial ageing class so I don't have images to show. However I did use the ageing technique for my Miss Havisham timed assessment

Firstly using a dark shadow and thin brush apply frown and wrinkle like lines to the face as it where wrinkles would be in real life. You may need to get the model to frown to get more accurate lines.
Next apply a light concealer in between all of the dark lines again with a thin brush.
Next using a small blending brush blend the two colours until you have a wrinkled effect, try not to completely blend it all out.
Add setting powder
Your finished aged look should look something like this, you can add more or less wrinkles dependant on your desired look.
Next using a small blending brush blend the two colours until you have a wrinkled effect, try not to completely blend it all out.
Add setting powder
Your finished aged look should look something like this, you can add more or less wrinkles dependant on your desired look.
Black Eyes & Cuts in The Studio
Black Eyes & Cuts
In today studio session I learnt how to create black eyes and cuts. I found this session really interesting and I feel that it has made me definitely want to continue special effects for year 2. This was my first time using latex, it was ok but didnt like the smell.
- Latex
- Colour wheel
- Foundation base
- Sponges
- Knife
- Fake blood
- Pus
Cuts
Firstly I applied the latex using a sponge, using a knife I gently made my slice affect to the latex to create the cut.
Then using cold air from the hair dryer I dried the latex. (It dries by itself but the hair dryer speeds the process)
Once dry I applied the models foundation base to match the latex with the skin.
Next I added fake blood and pus to the wound to make look realistic.

Black Eye
To create a black/bruised eye I used a Ben Nye colour wheel
Firstly I applied a base to my models face
Selecting a mixture of the purple tones in the colour wheel I used a spatula to gather some of the colours onto the back of my hand.
Using the tips of my finger I tapped the colour around the eye area, where people tend to get black eyes
I then blended it in until it gave a natural effect.


Burns in The Studio
Burns
In today's Studio session I learned how to create burns using gelatine. I enjoyed this session and love the effect it makes so will be definitely using this type of special effect for my timed assessment.Things Needed
- Gelatine
- Fake blood
- Pus
- Glycerine
- Sponges
- Hair dryer
- Supracolor
- Illamasqua powder
- So firstly the gelatine needed to be heated this was done by placing the glycerine into a bowl of water and heating in the microwave for 10 seconds, the gelatine then became a honey like texture.
- Next using a spatula apply the gelatine to the chosen area checking the temperature before hand
- Using your fingers or a stipple sponge, tap the area to give an uneven look
- Set with Illamasqua powder
- Using the supracolor palette add up reds and browns to the area
- Once all the above was completed I added fake pus and blood, and lastly applied a coat of glycerine which added a shine.
And here it is.......... A severe Burns

Development of Miss Havisham & Estella
So I have been playing around with my Miss Havisham look, trying to get it ready for the timed assessment
- Gelatine
- Latex
- Supracolour palette
- Glycerine
- Foundation
- Barrier cream
- Foundation, powder, shadow and blending brushes
- Make up sponges
- Spatulas
I am definitely going to have a burn effect to my look as i found creating burns one of my strengths.
I have also decided that I will not be using Latex to create my look at I don't like the effect it gives, so I will be using Gelatine.


Estella
Estella is the adoptive daughter of Miss Havisham of Sanis House. Unlike her mother Estella is well groomed and put together. Initially Estella's character is the role of a child, my views on her in at this stage is that she appears to be very spoilt and not used to being around other children of her age. I feel she looks down on fellow cast member 'Pip' as he is a lower class citizen to her. She has been moulded by her mother not to love in order never to be heartbroken.
 As she grows older her character becomes a lot more laid back, although she still is slyly a bit up herself.
By the time she's an adult id say the story is late Victorian, due to her look. Her hairstyle has changed from being completely pinned up to being loosely ringlet.
I have added two images of Estella, so that if you haven't read 'Great Expectations' you can kind of see the era in which it is set.

By the time she's an adult id say the story is late Victorian, due to her look. Her hairstyle has changed from being completely pinned up to being loosely ringlet.
I have added two images of Estella, so that if you haven't read 'Great Expectations' you can kind of see the era in which it is set.

Ageing Hair
Ageing the hair
The easiest way to grey the hair is to used dry shampoo. This technique is good to age a full head of hair by spraying a numerous amount of dry shampoo to the hair. This will make the hair appear grey and will also depend on how much spray you apply.
You can also age the brows and lashes by using a mascara wand and supracolour. Apply some of the white supracolour to the mascara wand and brush slightly into the brows or lashes. This technique can also be used on the beard area.
Miss Havisham Portrayals
Portrayals of Miss Havisham
If you haven't read 'Great Expectations' and was just looking at images of Miss Havisham you would probably think she was someone out of a mental hospital. Or even you might mistake her as an elderly lady with no family to help look after her.
Its not just her appearance that gives this impression but also her surroundings.
Miss Havisham's character has been in her wedding gown since she was jilted at the alter. Her wedding table is still laid and covered in dust and cobwebs.
 |
| http://www.telegraph.co.uk/culture/film/film-news/9622620/Helena-Bonham-Carter-plays-Miss-Havisham-in-new-Great-Expectations-film.html |
 |
| http://images.npg.org.uk/800_800/7/9/mw67579.jpg |
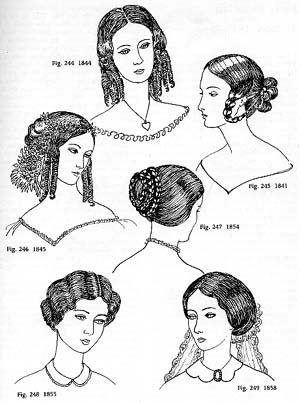
Victorian Hairstyles
Hairstyles in the Victorian Era
I was given a task to research Victorian Hairstyles from 1830-1860 these dates being early Victorian, and 1860-1890.
The image below is a timeline of a Victorian hairstyles a from those dates.

Their hair initially would always be centre parted and pinned in a bun and would generally have braids to decorate around the bun, also the front section of the hair would be braided down the side of the face and looped around and pinned to the bun.
As time went on the hairstyles would change slightly but would still have the centre parting however the hair would just be swooped into a bun. Woman would start to have more hair curled than pinned up and later would start to add hair accessories to the hair.
Subscribe to:
Comments (Atom)